drivePACK Editor software website general index
• Introduction.
• Software guide and tutorials.
• ROM PACK data organisation and instructions.
• License and downloads.
• Software guide and tutorials.
• ROM PACK data organisation and instructions.
• License and downloads.
Software guide and tutorials
This page presents the options available in the drivePACK Editor and explains how to use them to edit or create new themes. It is organized into two main sections:
- Software guide: this first section provides a detailed description of the drivePACK Editor user interface, explaining the most important screens, menus, and options.
- Tutorials: at the end of the page, you will find the tutorials section with several video tutorials demonstrating how to use the application and its most useful features.
- Software guide: this first section provides a detailed description of the drivePACK Editor user interface, explaining the most important screens, menus, and options.
- Tutorials: at the end of the page, you will find the tutorials section with several video tutorials demonstrating how to use the application and its most useful features.
Software guide
All the functions and operations that can be performed by the drivePACK Editor are accessible through the application interface, which is organised into the following forms:
- Main form: groups the options and tools to edit and organise the cartridge content and themes code.
- Send form: with the options to send to the connected drivePACK unit the binary of the current ROM PACK project.
- Receive form: with the options to receive in the computer the binary in the memory of the connected drivePACK unit.
- MIDI import form: allows you to import MIDI files specially adapted to be loaded into the drivePACK Editor.
- Main form: groups the options and tools to edit and organise the cartridge content and themes code.
- Send form: with the options to send to the connected drivePACK unit the binary of the current ROM PACK project.
- Receive form: with the options to receive in the computer the binary in the memory of the connected drivePACK unit.
- MIDI import form: allows you to import MIDI files specially adapted to be loaded into the drivePACK Editor.
Main form
The drivePACK Editor Main form is the application main screen and it is organised into the following elements:
- Top menu strip: with the File menu that groups all the actions related with files.
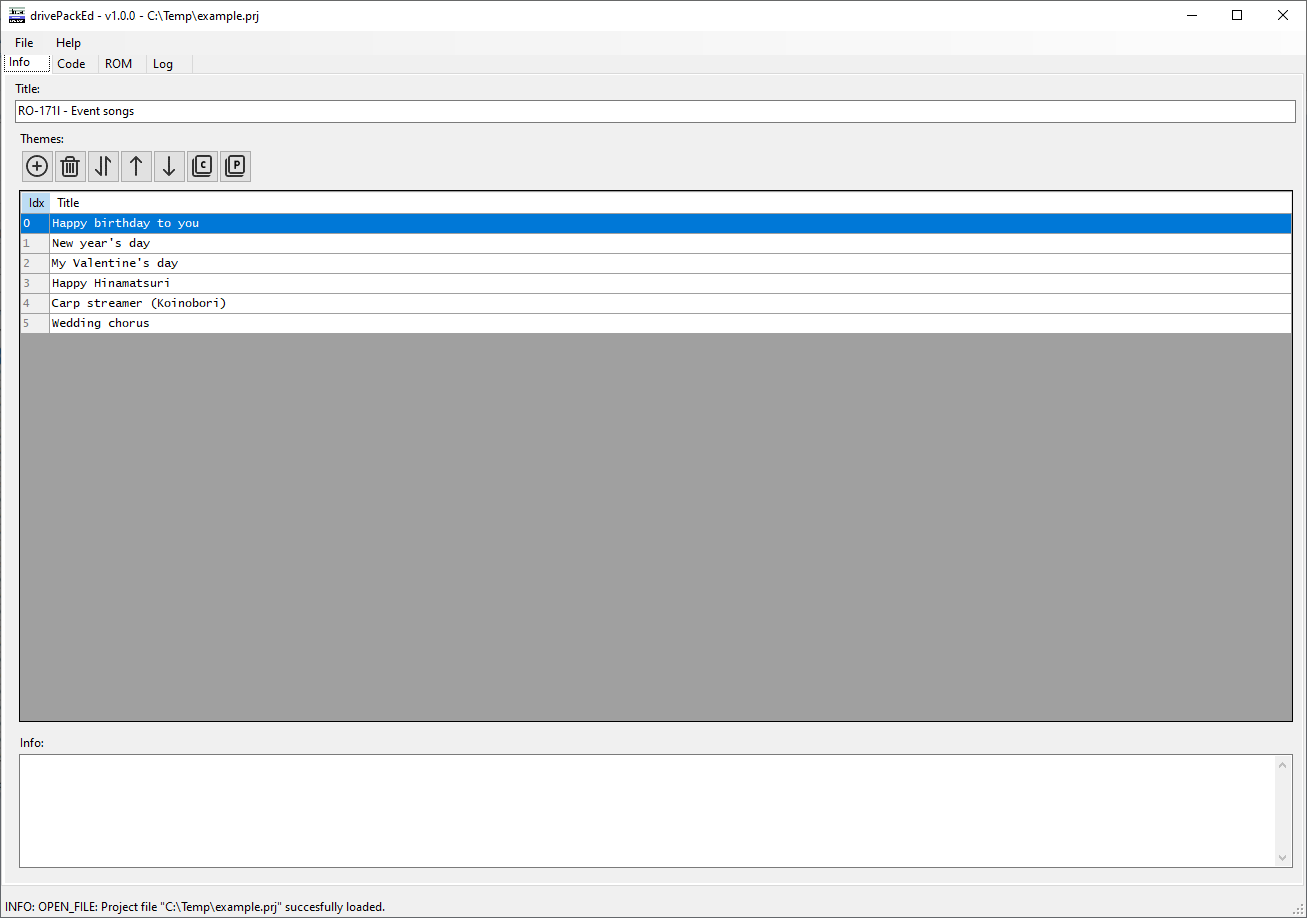
- Info tab page: to organise the ROM PACK project themes list and to enter other general information of the project.
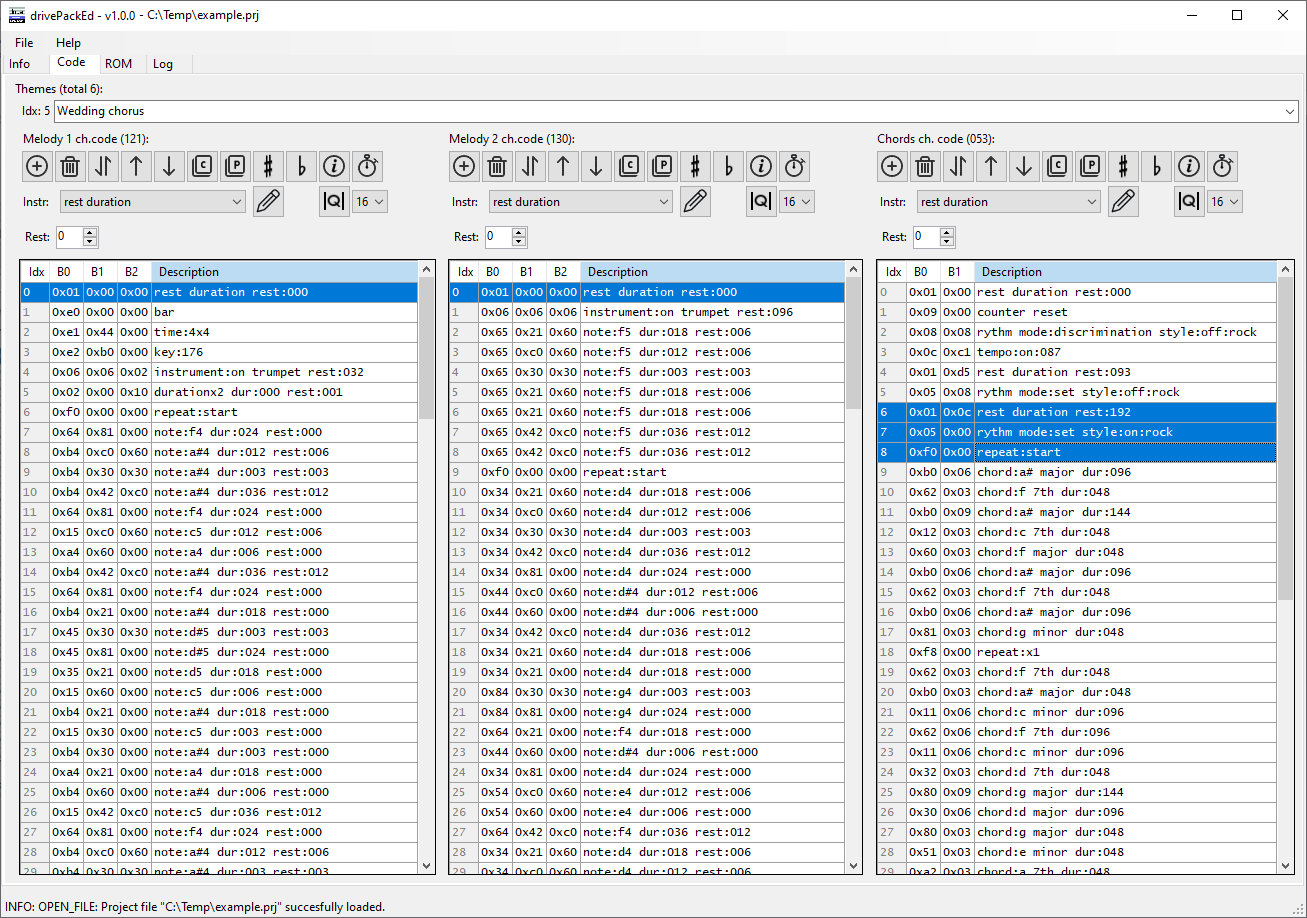
- Code tab page: to view and edit the code of the ROM PACK themes.
- ROM tab page: to view or edit the binary content of the current ROM PACK project.
- Logs tab page: only for maintenance and debugging purposes.
The Info and the Code tab pages, contain the tools that allow editing the themes list and the themes content in the ROM PACK project. The ROM tab page allows you to manually edit the binary content of the ROM PACK cartridge.
- Top menu strip: with the File menu that groups all the actions related with files.
- Info tab page: to organise the ROM PACK project themes list and to enter other general information of the project.
- Code tab page: to view and edit the code of the ROM PACK themes.
- ROM tab page: to view or edit the binary content of the current ROM PACK project.
- Logs tab page: only for maintenance and debugging purposes.
The Info and the Code tab pages, contain the tools that allow editing the themes list and the themes content in the ROM PACK project. The ROM tab page allows you to manually edit the binary content of the ROM PACK cartridge.
Top menu strip
The File submenu in the top menu strip contains the options that lets you perform various file operations, like importing or exporting themes code files (.cod), create new projects (.prj), save or load the content of ROM PACK binary files (.drp, .bin)...
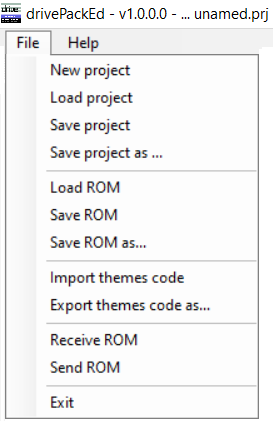
• New project: starts a new empty ROM PACK cartridge project (.prj). Once the new project has been created, add a new theme to the project to start creating a new tune.
• Load project: loads an existing project file (.prj) into the drivePACK Editor.
• Save project: overwrites the current project information into the current project file (.prj).
• Save project as: saves the current project information to a ROM PACK project file (.prj) with the specified name.
• Load ROM: loads the content of the specified ROM PACK binary file (.drp, .bin) into the current project. The previous content of the project is overwritten with the content of the loaded binary file.
• Save ROM: builds and saves the current project as a binary file that can be read and played by the drivePACK unit (.drp) or by other custom ROM PACK emulators (.bin).
• Save ROM as: builds and saves the current project as a binary file with the specified name. This file can be then read by the drivePACK unit (.drp) or other custom ROM PACK emulators (.bin).
• Import themes code: loads into the current project's themes list the themes contained in the specified file. It can import exported ROM PACK themes files (.cod) and also specially adapted MIDI files. The imported themes are added just after the first selected theme in the Themes list in the Info tab page. Selecting a file with .mid extension opens the MIDI import form with the file importing options.
• Export themes code as: saves the information of the selected themes to a drivePACK exported themes file (.cod). Themes code files contain the instructions of a set of themes and can be viewed or also edited in a standard text editor.
• Receive ROM: opens the form that allows receiving in the computer the ROM PACK cartridge code currently loaded in the memory of drivePACK unit connected to the computer.
• Send ROM: opens the form that allows sending the content of the current project to the memory of the connected drivePACK unit.
• Exit: closes the current project and leaves the application.
drivePACK Editor can read and generate ROM binary files in the custom .drp file format .or in raw .bin format. The custom .drp file format contains the ROM PACK cartridge binary content, but also other information like the cartridge name, the themes titles and other, while the .bin files only contain the cartridge binary content. The .drp file format is the one used by the drivePACK emulator. Binary files can be converted from one format to the other by loading and saving them with the drivePACK editor.
The Export and Import commands can be used to move themes from one cartridge to another to create custom compilations. Simply open the projects with the desired themes, select and export them to .cod files, then create a new project or open an existing one and add to it the previously exported themes by importing them with the Import tool.
• Load project: loads an existing project file (.prj) into the drivePACK Editor.
• Save project: overwrites the current project information into the current project file (.prj).
• Save project as: saves the current project information to a ROM PACK project file (.prj) with the specified name.
• Load ROM: loads the content of the specified ROM PACK binary file (.drp, .bin) into the current project. The previous content of the project is overwritten with the content of the loaded binary file.
• Save ROM: builds and saves the current project as a binary file that can be read and played by the drivePACK unit (.drp) or by other custom ROM PACK emulators (.bin).
• Save ROM as: builds and saves the current project as a binary file with the specified name. This file can be then read by the drivePACK unit (.drp) or other custom ROM PACK emulators (.bin).
• Import themes code: loads into the current project's themes list the themes contained in the specified file. It can import exported ROM PACK themes files (.cod) and also specially adapted MIDI files. The imported themes are added just after the first selected theme in the Themes list in the Info tab page. Selecting a file with .mid extension opens the MIDI import form with the file importing options.
• Export themes code as: saves the information of the selected themes to a drivePACK exported themes file (.cod). Themes code files contain the instructions of a set of themes and can be viewed or also edited in a standard text editor.
• Receive ROM: opens the form that allows receiving in the computer the ROM PACK cartridge code currently loaded in the memory of drivePACK unit connected to the computer.
• Send ROM: opens the form that allows sending the content of the current project to the memory of the connected drivePACK unit.
• Exit: closes the current project and leaves the application.
drivePACK Editor can read and generate ROM binary files in the custom .drp file format .or in raw .bin format. The custom .drp file format contains the ROM PACK cartridge binary content, but also other information like the cartridge name, the themes titles and other, while the .bin files only contain the cartridge binary content. The .drp file format is the one used by the drivePACK emulator. Binary files can be converted from one format to the other by loading and saving them with the drivePACK editor.
The Export and Import commands can be used to move themes from one cartridge to another to create custom compilations. Simply open the projects with the desired themes, select and export them to .cod files, then create a new project or open an existing one and add to it the previously exported themes by importing them with the Import tool.
Info tab page
The Info tab page allows you to edit and organize the general information and the themes list of the current ROM PACK cartridge project:
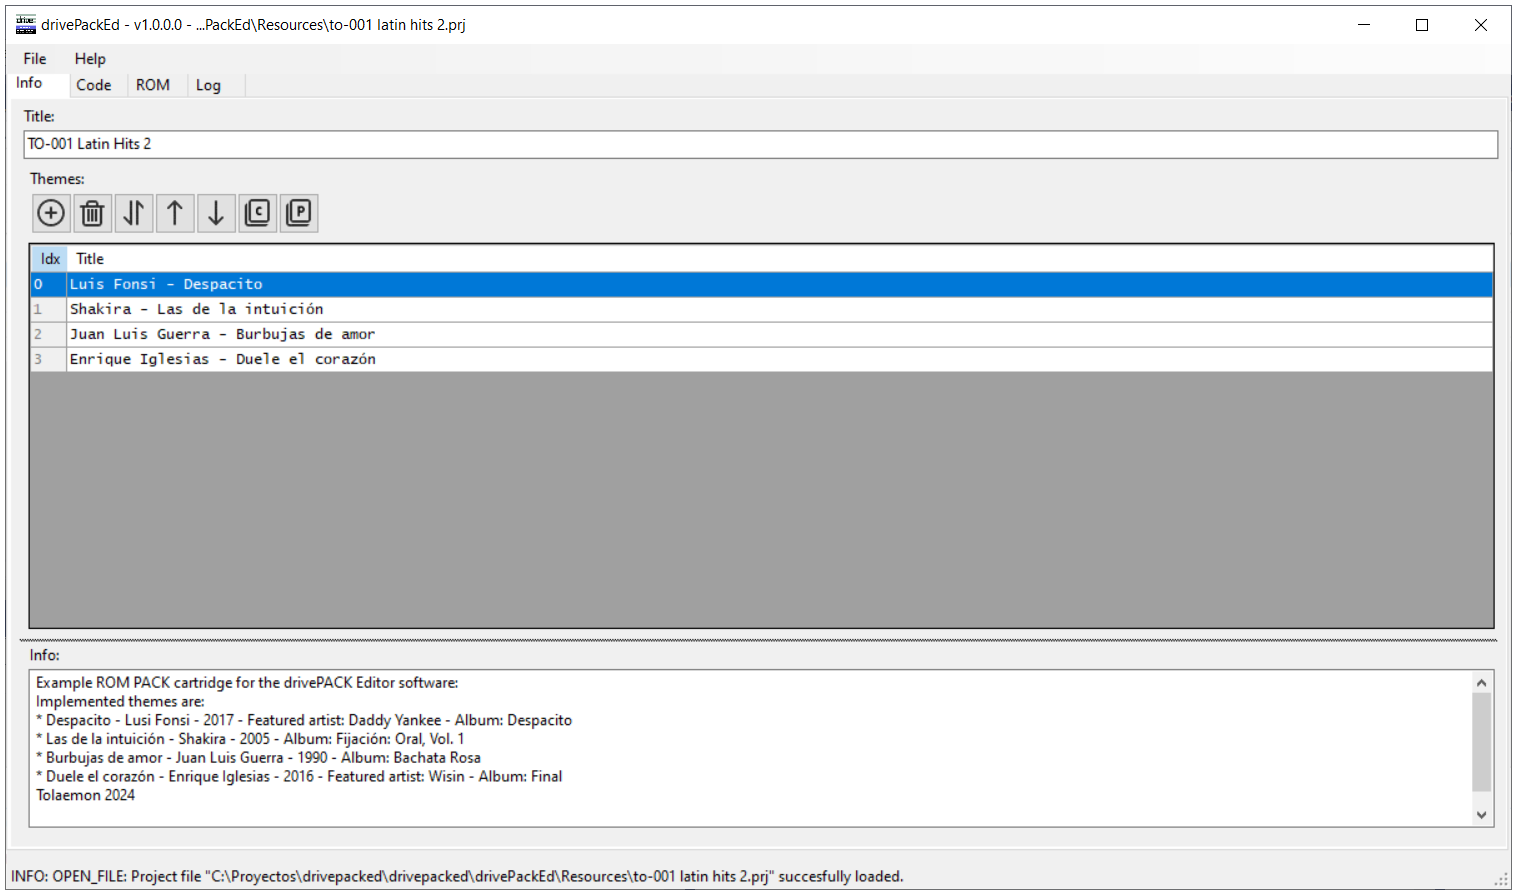
• Title: textbox to enter the title or name of the current ROM PACK cartridge. The title of the current active theme can also be set in the Themes combo box of the Code tab page.
• Themes toolbox: group of tools to add, delete or change the order of themes in the project themes list.
• Themes toolbox: group of tools to add, delete or change the order of themes in the project themes list.

 |
Adds a new theme to the project just after the first selected theme in the list. drivePACK Editor software will generate the default beginning and ending code for each channel every time a new theme is added. The default values set by the program on the different code instructions must be adapted by the user to theme requirements. |
 |
Removes from the project the selected themes in the list. |
 |
Swaps the position of the selected themes in the list. |
 |
Shifts by one position to the beginning of the list the selected themes. |
 |
Shifts by one position to the end of the list the selected themes. |
 |
Copies to temporary memory the current selected themes in the list. |
 |
Pastes into the project, just after the first selected theme, the themes in temporary memory. |
Themes can be copied from one cartridge to another using the Copy and Paste tools. First, use the Copy tool to copy to temporary memory the themes you want to move, then open the project of the destination cartridge and paste those themes with the Paste tool. The order of the themes can be then rearranged with the arrow tools.
• Themes list: with the list of themes in the current project. Double-clicking a theme in the list sets it as the current active theme. A single click on the name of a theme in the list allows you to edit the title of that theme. The order of the themes in that list can be changed with the tools in the Themes toolbox.
• Info: textbox to enter any text extra information related to the content of the ROM PACK cartridge.
Code tab page
The Code tab shows the information of the current active theme and allows you to edit the different melody and chord channels of the ROM PACK project themes. The current active theme is the one that has been selected by the user and is currently editable with the Code tab tools. To set a theme as the current active theme double click it in the Themes list of the Info tab page, or select it in the Themes drop down list in the Code tab page.
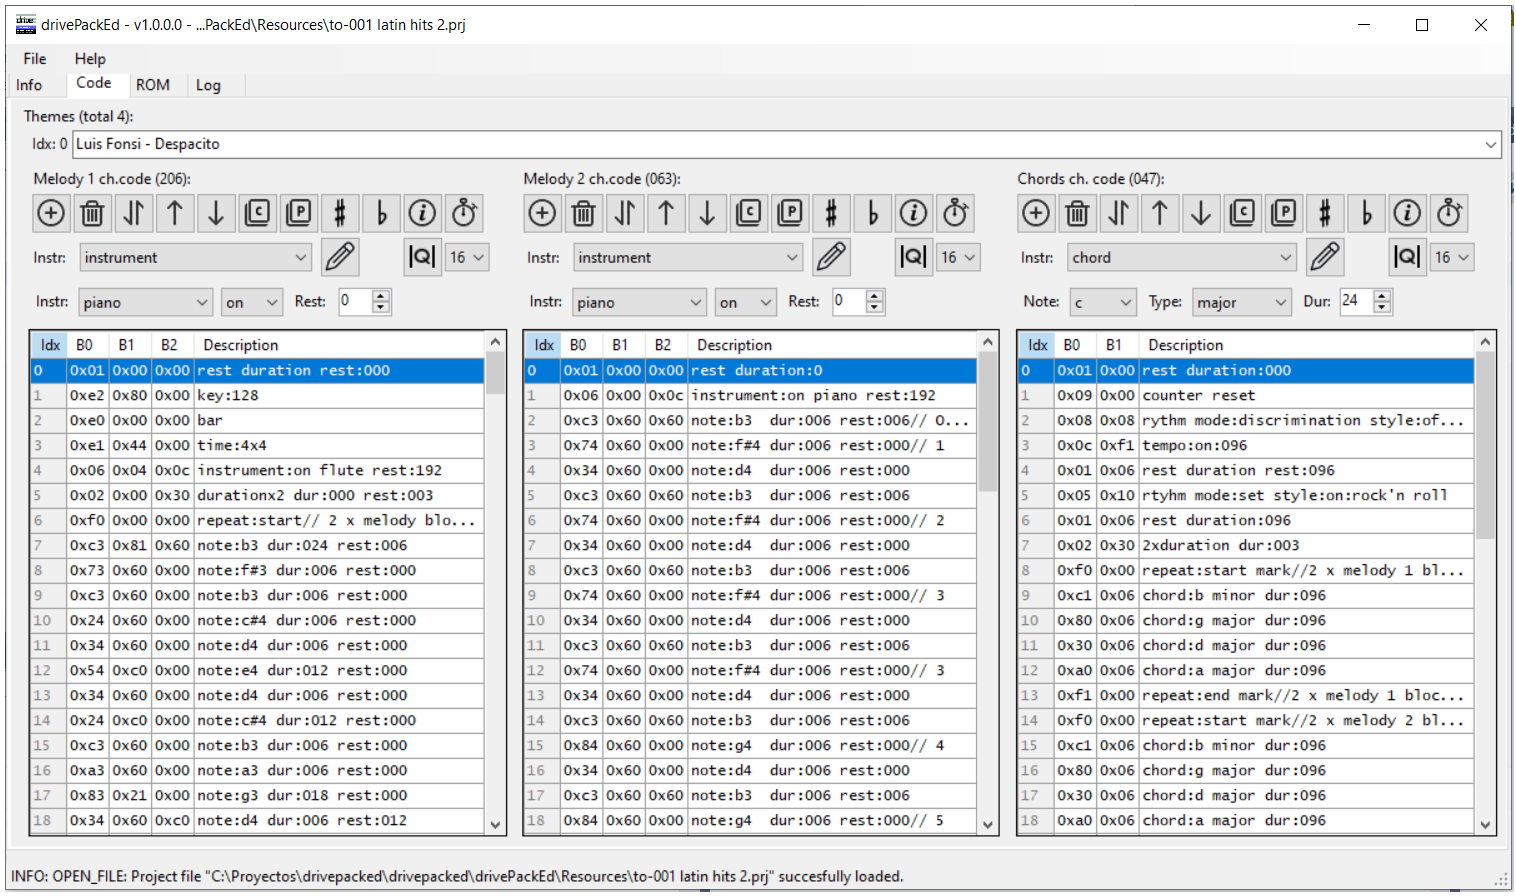
• Themes: combo box with an editable drop down list with the current themes in the ROM PACK cartridge. Selecting a new theme from the drop down list changes the current active theme. The content of the combo box can also be edited to change the name or title of that current active theme.
The Code tab page is organised in 3 vertical blocks or panels each one with the resources to edit the content of each of the three channels of the current active theme. This panels are the Melody 1 ch. code panel (main melody), the Melody 2 ch. code panel (obbligato), and the Chords ch. code panel (obbligato). Each code panel contains:
- Code toolbox: a toolbox with different tools that allow to organise and to edit the code of that channel ( move, swap, add, remove instructions ...)
- Instruction edition controls:: a set of controls to set the value of the parameters of the current edited instruction of the channel.
- Instructions list: with the list of instructions of the channel's code.
• Code toolbox: group of tools to modify and organise the instructions of the channel:
The Code tab page is organised in 3 vertical blocks or panels each one with the resources to edit the content of each of the three channels of the current active theme. This panels are the Melody 1 ch. code panel (main melody), the Melody 2 ch. code panel (obbligato), and the Chords ch. code panel (obbligato). Each code panel contains:
- Code toolbox: a toolbox with different tools that allow to organise and to edit the code of that channel ( move, swap, add, remove instructions ...)
- Instruction edition controls:: a set of controls to set the value of the parameters of the current edited instruction of the channel.
- Instructions list: with the list of instructions of the channel's code.
• Code toolbox: group of tools to modify and organise the instructions of the channel:

|
Adds a new instruction to the channels code, right after the first selected instruction in the panel's instruction list. The added instruction is the currently configured in the Instruction edition controls. |
|
Removes the panel instructions list selected instructions from the channel code. |
|
Swaps the position of the selected instructions in the panel instructions list. |
|
Shifts by one position to the beginning of the panel instructions list the selected instructions. |
|
Shifts by one position to the end of the panel instructions list the selected instructions. |
|
Copies to the temporary memory the current selected instructions in the panel instructions list. |
|
Pastes into the panel instruction list, just after the first selected instruction, the instructions in temporary memory. |
 |
Moves up half tone the selected instructions of the panel instructions list. It only affects to the note or chord instructions. |
 |
Moves down half tone the selected instructions of the panel instructions list. It only affects to the note or chord instructions. |
 |
Parses the instructions selected in the panel's instruction list and updates their description field with the instruction name followed by the value of its parameters. Custom comments can also be added into the description field by placing them begin the "//" symbol. Custom comments are not removed when the instructions are parsed again. Instructions that have a custom comment without any other text before the "//" symbol are not parsed, and the custom comment will be the only description. |
 |
Calculates and shows the note, chord and rest total duration of the instructions selected in the panel instructions list. Calculating the duration of blocks of code of a channel is useful to align that blocks of code with the blocks of code of other channels to ensure that the notes and chords of the different channels are played at the desired time and with the right duration. |
 |
Automatically corrects the timing of the notes or chords selected in the panel instructions list, snapping them closer to the timing grid subdivision set by the numeric up down control next to the button. Quantising can help to tighten up instructions that are slightly off-tempo or rhythmically loose. |
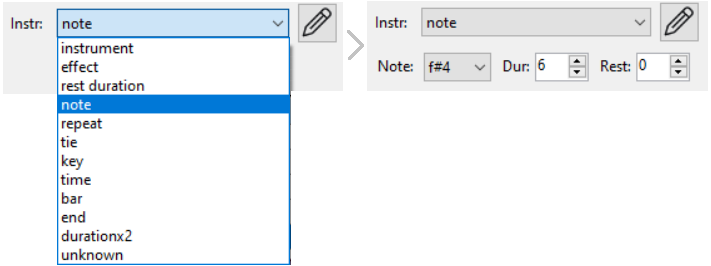
• Instruction edition controls: group of controls that allow configuring the parameters of the currently edited instruction. The controls under the Instruction selection combo box ( and the pencil icon ) allow adjusting the instruction parameters values. These controls are different depending on the instruction selected in the instruction selection combo box, that is because each instruction has different parameters. Once the instruction and its parameters values has been set, pressing the pencil icon applies that changes into the instructions selected in the instructions list.
Selecting an instruction in the Instruction list updates the instruction and parameters of the Instruction edition controls with the values of that selected instruction.
 |
Updates the panel selected code with the instruction in the Instruction edition controls. Sets the configured instruction and its parameters values into the instructions selected in the panel's instruction list. Replaces the selected instructions by the instruction and parameters configured in the Instruction edition controls. |
• Instruction list: with the code of that channel. Is the sequence of instructions of that channel of the theme. The instructions of the Melody 1 and Melody 2 channels take 3 bytes and the description. The instructions of the chords and ryhtm channel take 2 bytes and the description. The description of each instruction is automatically generated when the instruction is edited with the edition controls or when the user presses the "Parse" button. It is also possible to add custom comments in the description placing them after the "//" symbol. The comments following the // symbol will be preserved even if the instruction is updated.
The byte cells of the different instructions in the Instruction list can be edited by hand to set custom values. To manually edit the code, one must thoroughly understand and be familiar with the binary implementation of the instructions. If it is not the case, use the Instruction edition controls instead.
Send form
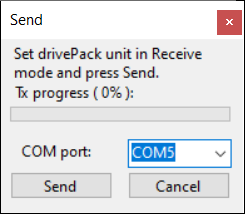
This form allows you to send the binary of the current ROM PACK project to the drivePACK unit connected to the computer. This is useful to test the themes on a real keyboard while they are being composed in the application. Before sending the binary to the remote unit check that the drivePACK unit is properly connected and detected by the computer, and that the right COM port is selected in the COM port combo box. Then set the drivePACK unit in receive mode and press Send button in the application to send the binary.
Receive form
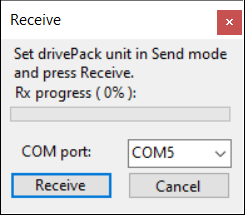
This form allows you to receive in the application the binary in the memory of the drivePACK unit connected to the computer. Before receiving the binary from the remote unit check that the drivePACK unit is properly connected and detected by the computer, and that the right COM port is selected in the COM port combo box. Then set the drivePACK unit in send mode and press the Receive button to start receiving the binary in the computer. Once received, use the Decode button in the ROM tab page to decode the binary content and get the list of themes and its code.
MIDI import form
In order to make the composition of themes easier, the drivePACK Editor includes the option to import MIDI files exclusively created for ROM PACK keyboards, using specialised music software tools (DAW, trackers, MIDI editors...). This option is not intended for importing just any MIDI file, since the limitations of the ROM PACK keyboards make this unfeasible. It is specifically designed to allow the user to compose music easily using other specialised music edition applications and then import and convert them to ROM PACK themes with the application.
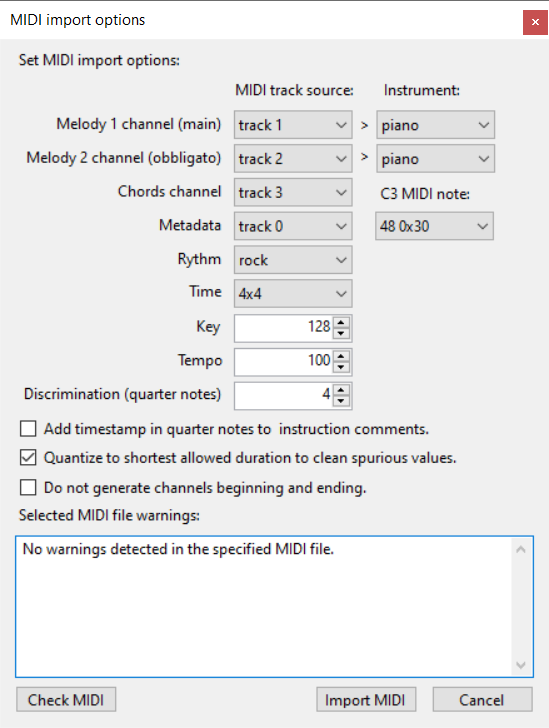
The MIDI import form has different controls to configure different MIDI import options:
• Melody 1 channel ( main ): sets the MIDI channel source for the notes of the Melody 1 channel. The drop down list of the combo box allows you to select which track of the MIDI file will be used to import the notes for the Melody 1 channel( main ).
• Instrument ( melody 1 ): to specify which of the keyboard's instrument must be used to play the notes imported into the Melody 1 channel (main). The selected instrument will be set in the timbre instruction in the melody 1 channel's header.
• Melody 2 channel (obbligato): sets the MIDI channel source for the notes of the Melody 2 channel. The drop down list of the combo box allows you to select which track of the MIDI file will be used to import the notes for the Melody 2 channel( obbligato ).
• Instrument ( melody 2 ): to specify which of the keyboard's instrument must be used to play the notes imported into the Melody 2 channel. The selected instrument will be set in the timbre instruction in the melody 2 channel's header.
• C3 MIDI note: to indicate the MIDI note number considered as C3 in the MIDI file. Some DAWs may have octaves shifted compared to other DAWs, so what corresponds to the 2nd or 3rd octave in one may correspond to the 3rd or 4th octave in another, or vice versa. The lowest note allowed in the Melody 1 or Melody 2 channel is F3, but this option is only intended to ensure that the application correctly maps the file's notes to the proper octave..
• Chords channel: sets the MIDI channel source for the root notes for the Chords channel. The drop down list of the combo box allows you to select which of the tracks of the MIDI file must be used to import the chord root notes for the themes Chords channel. By default, all the root notes are converted to major chords, so they will have to be adjusted to the corresponding chord type ( major, minor, m7 ... ) in the application with the Instruction edition controls of the chord instruction.
• Metadata: to indicate the channel of the MIDI imported file that contains the file general information. The software will use this track to get the theme title.
• Rhythm: to specify which of the keyboard's rhythm must be used to play the imported theme. The selected rhythm value will be set in the rhythm instruction in the chords channel's header.
• Time: to set the time to use in the melody. The selected time value will be set in the parameters of the time instruction in the Melody 1 channel's header.
• Key: to set the key of the imported theme. The selected theme key value will be set in the parameters of the key instruction in the Melody 1 channel's header.
• Tempo: to set the tempo ( playing speed ) of the imported theme. The selected tempo value will be set in the parameters of the tempo instruction in the Melody 1 channel's header.
• Discrimination (quarter notes): allows configuring the number of ticks, in quarter notes, preceding the start of the theme playback. The application will adjust the rhythm instructions and the channels initial rest time according to the configured values. Setting discrimination to 0 disables the ticks at the beginning of the theme.
• Add timestamp in quarter notes to instruction comments: check this option to add the note's timestamp in quarter notes and whole notes in the description field. The timestamp can be useful to help locate the notes in the original MIDI track within the DAW.
• Quantize to shortest allowed duration to clear spurious values: rounds the duration of notes and rests to the nearest value to match the rhythm pattern. This removes small errors in the note or rest duration that may cause disadjustments in the melody timings.
• Do not generate channels beginning and ending: check this option if, by any reason, drivePACK Editor should not generate the header and ending instructions of each channel.
• Selected MIDI file warnings: this text box shows the different issues that may cause problems when importing.
• Check MIDI: press this button to check again for all the issues that may cause problems when importing the selected MIDI file.
• Import MIDI: press that button to import the selected MIDI file once all the necessary importing options have been properly set.
• Melody 1 channel ( main ): sets the MIDI channel source for the notes of the Melody 1 channel. The drop down list of the combo box allows you to select which track of the MIDI file will be used to import the notes for the Melody 1 channel( main ).
• Instrument ( melody 1 ): to specify which of the keyboard's instrument must be used to play the notes imported into the Melody 1 channel (main). The selected instrument will be set in the timbre instruction in the melody 1 channel's header.
• Melody 2 channel (obbligato): sets the MIDI channel source for the notes of the Melody 2 channel. The drop down list of the combo box allows you to select which track of the MIDI file will be used to import the notes for the Melody 2 channel( obbligato ).
• Instrument ( melody 2 ): to specify which of the keyboard's instrument must be used to play the notes imported into the Melody 2 channel. The selected instrument will be set in the timbre instruction in the melody 2 channel's header.
• C3 MIDI note: to indicate the MIDI note number considered as C3 in the MIDI file. Some DAWs may have octaves shifted compared to other DAWs, so what corresponds to the 2nd or 3rd octave in one may correspond to the 3rd or 4th octave in another, or vice versa. The lowest note allowed in the Melody 1 or Melody 2 channel is F3, but this option is only intended to ensure that the application correctly maps the file's notes to the proper octave..
• Chords channel: sets the MIDI channel source for the root notes for the Chords channel. The drop down list of the combo box allows you to select which of the tracks of the MIDI file must be used to import the chord root notes for the themes Chords channel. By default, all the root notes are converted to major chords, so they will have to be adjusted to the corresponding chord type ( major, minor, m7 ... ) in the application with the Instruction edition controls of the chord instruction.
• Metadata: to indicate the channel of the MIDI imported file that contains the file general information. The software will use this track to get the theme title.
• Rhythm: to specify which of the keyboard's rhythm must be used to play the imported theme. The selected rhythm value will be set in the rhythm instruction in the chords channel's header.
• Time: to set the time to use in the melody. The selected time value will be set in the parameters of the time instruction in the Melody 1 channel's header.
• Key: to set the key of the imported theme. The selected theme key value will be set in the parameters of the key instruction in the Melody 1 channel's header.
• Tempo: to set the tempo ( playing speed ) of the imported theme. The selected tempo value will be set in the parameters of the tempo instruction in the Melody 1 channel's header.
• Discrimination (quarter notes): allows configuring the number of ticks, in quarter notes, preceding the start of the theme playback. The application will adjust the rhythm instructions and the channels initial rest time according to the configured values. Setting discrimination to 0 disables the ticks at the beginning of the theme.
• Add timestamp in quarter notes to instruction comments: check this option to add the note's timestamp in quarter notes and whole notes in the description field. The timestamp can be useful to help locate the notes in the original MIDI track within the DAW.
• Quantize to shortest allowed duration to clear spurious values: rounds the duration of notes and rests to the nearest value to match the rhythm pattern. This removes small errors in the note or rest duration that may cause disadjustments in the melody timings.
• Do not generate channels beginning and ending: check this option if, by any reason, drivePACK Editor should not generate the header and ending instructions of each channel.
• Selected MIDI file warnings: this text box shows the different issues that may cause problems when importing.
• Check MIDI: press this button to check again for all the issues that may cause problems when importing the selected MIDI file.
• Import MIDI: press that button to import the selected MIDI file once all the necessary importing options have been properly set.
Notes on creating and importing MIDI files
When creating ROM PACK themes from MIDI files, the limitations of the ROM PACK format must always be taken into account:
- The Melody 1 channel notes ( main melody ) of the ROM PACK cartridge will be taken from the specified MIDI track of the file.
- The Melody 2 channel notes ( obbligato ) of the ROM PACK cartridge will be taken from the specified MIDI track of the file.
- CASIO ROM PACK cartridges only allow notes between F3 and C6 so all the notes in the Melody 1 and 2 channels must be in this interval, otherwise an error will be generated when importing them.
- The chords in the Chords channel of the ROM PACK cartridge will be taken from the specified MIDI track of the file.
- MIDI files do not implement an specific chords command like the ROM PACKs, they are stored as multiple simultaneous playing notes instead. The MIDI track used to load the chords in the theme channel must only contain the root notes of the different chords. When imported with the software it will load them as major chords, so then the right chord type ( major, minor, m7 ... ) must be set with the Instruction edition controls.
- As ROM PACK channels are monophonic ( they don't support multiple notes playing at the same times ) all the MIDI tracks imported to create the theme must also be monophonic ( it is not allowed to have notes overlapped ).
- Any overlap between notes, no matter how small, should be avoided, as when converting the melody to monophonic, the application won't know exactly where one note ends and the next begins.
- To grant that all the notes play synchronized with the rhythm generated by the keyboard, it is strongly recommended that all the notes and rest duration fit into the standard notes timing values ( 3, 6, 18, 24, 30, 36 ...).
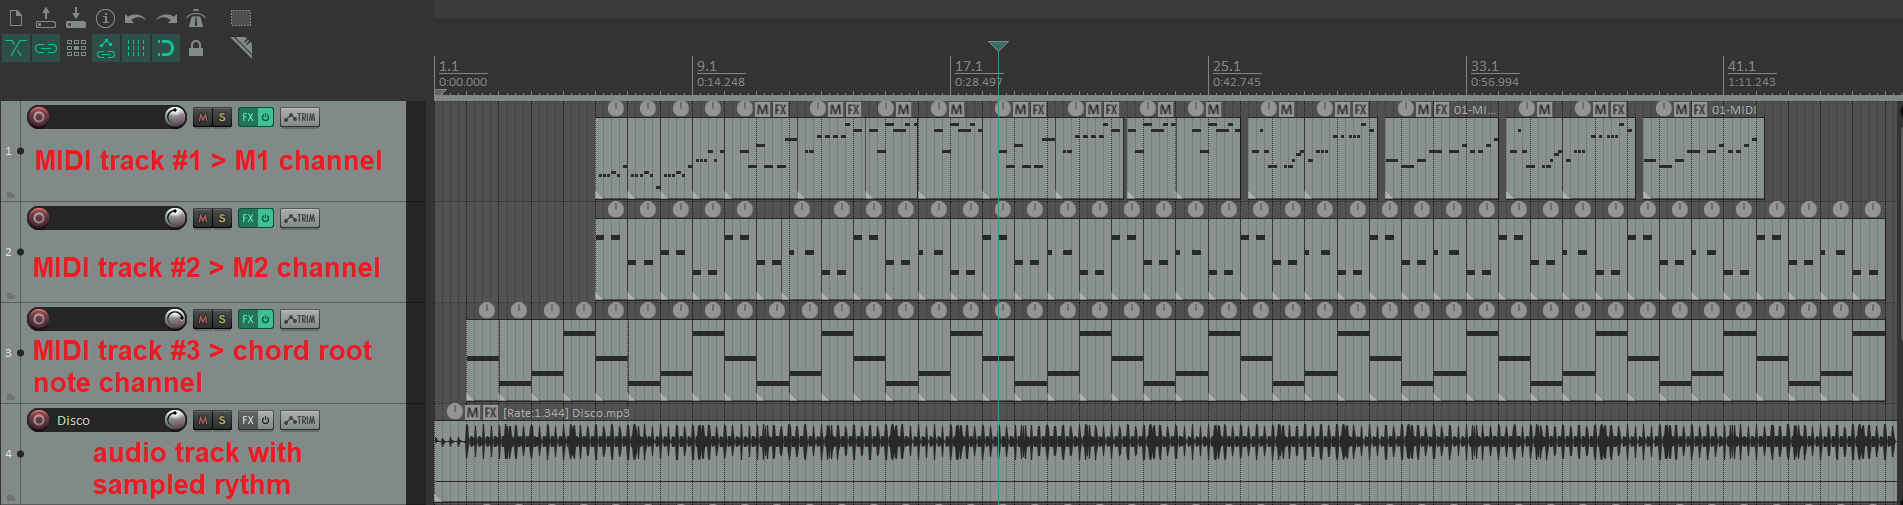
The following image shows a ROM PACK theme implementation in a DAW. The three first tracks of the project are exported to a MIDI file and then imported in the drivePACK Editor. The fourth track in the DAW is an audio track with a real CASIO keyboard rhythm sampled and adjusted to the project metronome grid to facilitate the melody composition. Wehn importing, the Track #1 of the MIDI file is mapped to Melody 1 channel, track #2 to Melody 2 channel, and track #3, which contains the root notes of the chords, to the chord channel. As all the chords will be imported as major chords, they will have to be adjusted to the right chord type with the drivePACK Editor application.
- The Melody 1 channel notes ( main melody ) of the ROM PACK cartridge will be taken from the specified MIDI track of the file.
- The Melody 2 channel notes ( obbligato ) of the ROM PACK cartridge will be taken from the specified MIDI track of the file.
- CASIO ROM PACK cartridges only allow notes between F3 and C6 so all the notes in the Melody 1 and 2 channels must be in this interval, otherwise an error will be generated when importing them.
- The chords in the Chords channel of the ROM PACK cartridge will be taken from the specified MIDI track of the file.
- MIDI files do not implement an specific chords command like the ROM PACKs, they are stored as multiple simultaneous playing notes instead. The MIDI track used to load the chords in the theme channel must only contain the root notes of the different chords. When imported with the software it will load them as major chords, so then the right chord type ( major, minor, m7 ... ) must be set with the Instruction edition controls.
- As ROM PACK channels are monophonic ( they don't support multiple notes playing at the same times ) all the MIDI tracks imported to create the theme must also be monophonic ( it is not allowed to have notes overlapped ).
- Any overlap between notes, no matter how small, should be avoided, as when converting the melody to monophonic, the application won't know exactly where one note ends and the next begins.
- To grant that all the notes play synchronized with the rhythm generated by the keyboard, it is strongly recommended that all the notes and rest duration fit into the standard notes timing values ( 3, 6, 18, 24, 30, 36 ...).
The following image shows a ROM PACK theme implementation in a DAW. The three first tracks of the project are exported to a MIDI file and then imported in the drivePACK Editor. The fourth track in the DAW is an audio track with a real CASIO keyboard rhythm sampled and adjusted to the project metronome grid to facilitate the melody composition. Wehn importing, the Track #1 of the MIDI file is mapped to Melody 1 channel, track #2 to Melody 2 channel, and track #3, which contains the root notes of the chords, to the chord channel. As all the chords will be imported as major chords, they will have to be adjusted to the right chord type with the drivePACK Editor application.
Tutorials
The following video tutorials show the most relevant features of the drivePACK Editor software and how to use them to edit or create new ROM PACK themes:
• Introduction: this video introduces the drivePACK Editor software. It provides a general overview of how users can use it to compose new tracks, modify existing ones, or import MIDI files to build custom cartridge files compatible with the drivePACK emulator. This video is also available in spanish language.
• Introduction: this video introduces the drivePACK Editor software. It provides a general overview of how users can use it to compose new tracks, modify existing ones, or import MIDI files to build custom cartridge files compatible with the drivePACK emulator. This video is also available in spanish language.
• Create a ROM PACK themes compilation: this tutorial demonstrates how to create custom song compilations by extracting tracks from various ROM PACK cartridges or from existing "drp" files. It details two methods for assembling these lists: copying and pasting directly between projects or exporting and importing theme ".cod" code files . Additionally, the video explains how to organize the tracklist order. This video is also available in spanish language.
• Create a theme from scratch: this video provides a step-by-step tutorial on how to program a musical melody from scratch, explaining the structure of the three channels within a ROM PACK theme. It demonstrates how to use the software's instruction editor to easily insert commands for melody notes and chords, without needing to manually code binary. This video is also available in spanish language.
• Create a theme from a MIDI file: this tutorial demonstrates how to create musical tracks for CASIO ROM PACK cartridges by composing a MIDI file in a DAW and importing it into the drivePACK Editor software. The video guides you through the import process. This video is also available in spanish language.

